
by Melanie in IA
When I started quilting in 2003, I had no idea what I was doing! All I knew was that a quilt was a couple of layers of fabric with some soft stuffing between. Over the next couple of years I made a few more quilts, and I figured out some things like how to use a rotary cutter, how to make a 1/4″ seam, and some design principles.
But for a long time I found the last step mysterious: how to finish a quilt by making and applying binding. The binding is the finishing edge of the quilt. A beautiful quilt deserves a well-made binding.
There are many ways to edge your quilt, but I will focus on the double-fold, straight-grain binding that is used on most quilts with straight edges.
Cutting the Binding
The first task, after choosing your fabric, is to decide how much binding you need. To get all the way around, start with the (width + length) x 2. For example, if you have a lap quilt that is 45″ x 60″, you need (45 + 60) x 2 = 210″. Now add 12″ for the corners and the joint. That makes 210 + 12 = 222″.
How much yardage do you need for that? It depends on how WIDE you want your binding. Most references will recommend cutting 2.5″ strips selvage to selvage.
If I need 222″, and I assume I have 40″ selvage to selvage (width of fabric), I need 6 cut strips to make the binding. (222/40 = 5.55. I need to round up to 6.) This is 6 x 40″ = 240″. If I only cut 5 strips, I would only have 200″, not enough. And really, it’s better to have too much than not enough.
(If you’re not cutting selvage to selvage, use the length of strips you’ll actually have. So if my strips will be 53″, I would use 222/53 = 4.19, and round up to cutting 5 strips. Due to yardage available to me, I often cut my binding along the selvage instead of edge to edge. I’ve never had a problem because of that.)
If I cut my strips 2.5″ wide, I need 6 x 2.5″, or 15″ of fabric. If I am buying new fabric for the binding, I would buy a half yard (18″). Again, better to have a little too much. But even a king-sized quilt won’t need more than a yard!
My personal preference is a narrow, tight binding, so I cut mine at 2.25″. You get to decide your own binding width, which may depend on how you finish it.
As always, press the fabric before cutting. When cutting edge to edge, unless the selvage puckers and distorts the fabric, there is NO need to cut it off now. It will be cut off after you’ve sewn strips together.
Square up the fabric and fold edge to edge. Depending on the ruler you use, you may need to fold a second time. Cut into strips.
When I cut strips for this and many other things, I like to use my June Tailor Shape Cut Ruler. I am not big on gadgets, but this is one I’ve found tremendously useful in getting accurate cuts. Here is a video demonstrating the product. (I have no affiliation with the company!)
Making the Binding
Once you have your strips cut, press them in half lengthwise, wrong sides together.
The first 4:15 of this video gives an excellent demo of how to prep the strips and make the binding. Just note, she uses the term “bias binding” a couple of times when what she really means is “bias seam.” Also note, once the full binding strip is made, you should press the short seams open, and then re-press at the joints in half, wrong sides together. (Likely there is an ad before the video.)
Applying the Binding
Cut a 45 degree angle on one end, as shown here. Lay the prepared binding all around the perimeter of the quilt before stitching it on. Check that the seams do not fall on the corners. It isn’t a fatal flaw if it does, but it is easier to finish nicely if you avoid them. Once you’ve decided a good starting point, pin it with a pin or two just to keep the whole thing from shifting.
Using a 1/4″ seam allowance, sew the binding to your quilt sandwich. Some people find a walking foot helpful with this. My machine’s feed dogs work fine and I don’t use the walking foot.
Starting at the end you cut at 45 degrees, leave a tail of about 10″ unstitched. Start sewing onto the right side of quilt with raw edges of binding to raw edges of quilt.
Continue all the way around, mitering the corners as you go, and stopping with a tail of about 10″ or more.
The link for Jaybird Quilts also shows how to make the final joint. This method works great.
Here are a couple of pictures to show it in more detail. First, I open up the fold on both sides to flatten it completely. That’s why about 10″ of tail on each side works well. With less than that, it’s hard to open it flat. With pinning, the two ends won’t shift and you can mark your line. Use a pencil with a faint line on light-colored fabric. With darker fabrics you can use a faint line of pigma or other permanent pen. Test it first, if you’re concerned the color will show through.

Attach the binding, leaving about 10″ unstitched from each end.

After pinning the binding smoothly and open along the quilt edge, draw a line on the finishing end, using the beginning angle as your template.

Once you have the first line drawn, measure a half inch from it and draw another line. This is your cut line.

Now unpin both ends so you can sew the angled ends together with a 1/4″ seam.
Note: my sister sent me this link from McCalls Quilting, showing a video of the same basic method.
Finishing the Binding
The nicest finish, if you are able, is to turn the binding to the back of the quilt and stitch by hand, using a blind or hemming stitch. Julie at Jaybirds.com has a video to give tips on this.
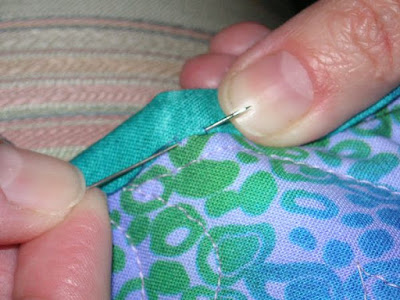
Here is a photo below of me working on binding by hand. You can see the needle travels underneath, so there is only a small stitch on the top. The thread should match the binding color to disappear most completely.
If you prefer to do a machine finish, refer to the Missouri Quilts video above for tips. She uses a decorative stitch to finish, with the binding first applied to the back of the quilt rather than the front. An alternative, which I’ve used many times, is that shown by Judy Laquidara at Patchwork Times.
The photo below shows me finishing the binding by machine. The TOP of the checkerboard is showing. I stitched in the ditch using a top thread to disappear as much as possible (in this case, I used green since it snugged up against the green binding and matched half of the squares.) The bobbin thread should match the binding, as you will stitch directly on it.

Save leftover binding strips in one place. You can piece mismatched binding together to finish scrap quilts with a playful edge, or finish utility quilts and mats without regard to coloring.
Old Dogs, New Tricks
Today (April 9) as I looked around, I saw this link for a different method of machine-finishing. Looks great, and well worth trying!

Great tutorial and thanks for sharing it. 😀
Hi Kathy! Thanks for stopping by.
Very helpful. Thanks for taking the time to do this. One question on the hand stitching, a friend of a friend does multiple stitches at once. I tried it but felt I struggled pulling the needle through. Maybe with practice. Have you ever tried that?
Hi Patience! I’ve tried multiple stitches, but I’m not very successful either. There may be some differences in how your friend does it (wider binding, so it isn’t pulled so tightly, for instance), or it could just be me!
Thanks for stopping by.
I prefer 2.25″ binding as well.! Thanks for the great videos… I have so much trouble finishing the binding. I just can never remember how to do it!
For a long time my worst part was just making the ends meet nicely! The overlap works but it isn’t as attractive as the seamed joint.
Thanks for reading and commenting.